- Published on
从标签模板到styled-components
- Authors

- 作者
- Michael
目录
简介
在前端工程化中,原生 CSS 展现出一些问题:复用性差、作用域与命名管理难度、缺乏工程处理能力等。为弥补这些不足,社区开发了各种解决方案,包括 CSS 预处理器、PostCSS 后处理工具,以及优秀的 CSS-in-JS 解决方案,如 Styled-Components。
标签模板(Tagged Template)
参考: ES6 入门
Styled-Component 是标签函数的实践, 对标签函数有基本的了解有助于我们使用 StyledComponents。
let a = 5
let b = 10

tag`Hello ${a + b} world ${a * b}`
// 等同于
tag(['Hello ', ' world ', ''], 15, 50)
我们可以通过下面两个例子加深一下理解:
实践 1:模版字符串 过滤高亮处理
Mary has commented on your topic Learn to use markdown
function highlight(strings,...values) {
    const  highlighted = values.map(value => `
        <span style="font-weight: bold">
            ${value}
        </span>
        `);
    return strings.reduce((prev,curr,i) => `
     ${prev}${curr}${highlighted[i] || '' }
    `,'')
}
const user = 'Mary';
const topic = 'Learn to use markdown';
const sentence = highlight`${user} has commented on your topic ${topic}`;
实践 2:模版字符串 过滤用户输入字符串
<script> => <script>
let message =
SaferHTML`<p>${sender} has sent you a message.</p>`;
function SaferHTML(templateData) {
let s = templateData[0];
for (let i = 1; i < arguments.length; i++) {
let arg = String(arguments[i]);
// Escape special characters in the substitution.
s += arg.replace(/&/g, "&")
.replace(/</g, "<")
.replace(/>/g, ">");
// Don't escape special characters in the template.
s += templateData[i];
}
return s;
}
为什么要使用 styled-components
- 自动关键 CSS
- 不会产生多余的类
- 容易删除 CSS
- 自动添加兼容前缀
- 良好的维护性
- 简单动态样式
组件化开发
styled-components 没有单独的创建一个 CSS 预处理语言。而是在 JS 的基础上增加了 CSS 能力。针对 React 扩展了 React 组件能力,这个对 JS + React 熟练的人是具有强吸引力的。styled-components 核心功能主打组件化样式,而不是一个功能强大的 css 预处理语言, 使用 styled-components, 在 React 中可以实现全组件式开发 CSS 样式。
const Button = styled.div`
  background: #f00;
`

const ReactComp = new Button()
原生 CSS 再 React 中的痛点
- 原生 css 没有作用域,极易造成全局污染
- 难以处理嵌套层级关系
- 没有组件化和模块化
- 多样式存在样式覆盖和优先级问题
- 样式多状态管理困难
api 说明
styled-components 提供了一系列 API,用于创建和管理样式化的组件。下面是一些常用的 styled-components API 的说明:
API
| api | 描述 | 示例 |
|---|---|---|
styled.tagname | 创建一个基于指定 HTML 标签的样式化组件。 | const StyledButton = styled.button``; |
styled(Component) | 创建一个基于指定 React 组件的样式化组件。 | const StyledComponent = styled(OtherComponent)``; |
styled(Component).attrs({}) | 为组件定义默认属性和属性值。 | const StyledButton = styled.button.attrs({ type: "button" })``; |
styled(Component).withConfig({}) | 使用指定的配置对象创建样式化组件。 | const StyledComponent = styled(Component).withConfig({ displayName: "CustomComponent" })``; |
css | 用于编写样式字符串或动态样式的辅助函数。 | const dynamicStyles = csscolor: ${props => props.color};``; |
ThemeProvider | 用于向组件树提供主题对象,使样式可以根据主题进行定制。 | <ThemeProvider theme={themeObject}><App /></ThemeProvider>; |
createGlobalStyle | 创建全局样式组件,可以在整个应用程序中共享和应用样式。 | const GlobalStyle = createGlobalStyle`body { margin: 0; }`; |
用法
基本用法
const Title = styled.h1`
  color: #bf4f74;
`;
const Wrapper = styled.section`
  background: papayawhip;
`;
render(
  <Wrapper>
    <Title>Hello World!</Title>
  </Wrapper>
);
传递参数(props)
const Button = styled.button<{ $primary?: boolean }>`
  background: ${(props) => (props.$primary ? "#BF4F74" : "white")};
  color: ${(props) => (props.$primary ? "white" : "#BF4F74")};
`;

render(
  <div>
    <Button>Normal</Button>
    <Button $primary>Primary</Button>
  </div>
);
组件扩展/继承样式
const Button = styled.button`
  color: #bf4f74;
`;

const TomatoButton = styled(Button)`
  color: tomato;
`;

render(
  <div>
    <Button>Normal Button</Button>
    <TomatoButton>Tomato Button</TomatoButton>
  </div>
);
包装任意组件(as)
const Button = styled.button`
  color: #bf4f74;
`;

const TomatoButton = styled(Button)`
  color: tomato;
  border-color: tomato;
`;

render(
  <div>
    <Button>Normal Button</Button>
    <Button as="a" href="#">
      Link with Button styles
    </Button>
    <TomatoButton as="a" href="#">
      Link with Tomato Button styles
    </TomatoButton>
  </div>
);
伪元素、伪选择器和嵌套
const Thing = styled.div.attrs((/* props */) => ({ tabIndex: 0 }))`
  color: blue;

  &:hover {
    color: red; // <Thing> when hovered
  }

  & ~ & {
    background: tomato; // <Thing> as a sibling of <Thing>, but maybe not directly next to it
  }

  & + & {
    background: lime; // <Thing> next to <Thing>
  }

  &.something {
    background: orange; // <Thing> tagged with an additional CSS class ".something"
  }

  .something-else & {
    border: 1px solid; // <Thing> inside another element labeled ".something-else"
  }
`

render(
  <React.Fragment>
    <Thing>Hello world!</Thing>
    <Thing>How ya doing?</Thing>
    <Thing className="something">The sun is shining...</Thing>
    <div>Pretty nice day today.</div>
    <Thing>Don't you think?</Thing>
    <div className="something-else">
      <Thing>Splendid.</Thing>
    </div>
  </React.Fragment>
)
使用.attr来传递参数
const Input = styled.input.attrs(props => ({
  type: "text",
  $size: props.$size || "1em",
})<{ $size?: string; }>`
  border: 2px solid #BF4F74;
  margin: ${props => props.$size};
  padding: ${props => props.$size};
`;

const PasswordInput = styled(Input).attrs({
  type: "password",
})`
  border: 2px solid aqua;
`;

render(
  <div>
    <Input placeholder="A bigger text input" size="2em" />
    <br />
    <PasswordInput placeholder="A bigger password input" size="2em" />
  </div>
);
动画
const rotate = keyframes`
from {
transform: rotate(0deg);
}
to {
transform: rotate(360deg);
}
`;
const Rotate = styled.div`
display: inline-block;
animation: ${rotate} 2s linear infinite;
padding: 2rem 1rem;
font-size: 1.2rem;
`;
render(<Rotate>< 💅🏾 ></Rotate>);
全局注入样式
const Thing = styled.div`
  && {
    color: blue;
  }
`;

const GlobalStyle = createGlobalStyle`
  div${Thing} {
    color: red;
  }
`;

render(
  <React.Fragment>
    <GlobalStyle />
    <Thing>I'm blue, da ba dee da ba daa</Thing>
  </React.Fragment>
);
主题
const Button = styled.button`
  font-size: 1em;
  color: ${(props) => props.theme.main};
  border: 2px solid ${(props) => props.theme.main};
`;

Button.defaultProps = {
  theme: {
    main: "#BF4F74",
  },
};

const theme = {
  main: "mediumseagreen",
};

render(
  <div>
    <Button>Normal</Button>

    <ThemeProvider theme={theme}>
      <Button>Themed</Button>
    </ThemeProvider>
  </div>
);
转发
const Input = styled.input`
  color: #bf4f74;
`;

class Form extends React.Component {
  constructor(props) {
    super(props);
    this.inputRef = React.createRef();
  }

  render() {
    return (
      <Input
        ref={this.inputRef}
        placeholder="Hover to focus!"
        onMouseEnter={() => {
          this.inputRef.current.focus();
        }}
      />
    );
  }
}

render(<Form />);
安全
| 安全问题 | 说明 |
|---|---|
| 防止注入攻击 | 默认会对样式字符串进行转义和处理,以防止恶意注入攻击 |
| 样式隔离 | 通过使用随机生成的唯一类名和作用域限制,确保组件的样式不会与全局样式发生冲突 |
| 样式封装 | 将组件的样式定义封装在组件本身内部,不会暴露任何实际的 CSS 类名或样式属性 |
| 内联样式 | 基于 JavaScript 对样式进行处理,而不是使用传统的 CSS 文件 |
| 静态样式提取 | 支持在服务器端进行样式提取,以确保样式在渲染之前就被生成和注入 |
服务端渲染
字符串形式服务端渲染
import { renderToString } from "react-dom/server";
import { ServerStyleSheet } from "styled-components";

const sheet = new ServerStyleSheet();
try {
  const html = renderToString(sheet.collectStyles(<YourApp />));
  const styleTags = sheet.getStyleTags();
} catch (error) {
  console.error(error);
} finally {
  sheet.seal();
}
流式服务端渲染 renderToNodeStream
import { renderToNodeStream } from "react-dom/server";
import styled, { ServerStyleSheet } from "styled-components";

res.write("<html><head><title>Test</title></head><body>");

const Heading = styled.h1`
  color: red;
`;

const sheet = new ServerStyleSheet();
const jsx = sheet.collectStyles(<Heading>Hello SSR!</Heading>);
const stream = sheet.interleaveWithNodeStream(renderToNodeStream(jsx));

stream.pipe(res, { end: false });
stream.on("end", () => res.end("</body></html>"));
实现原理

处理标签模板字面量
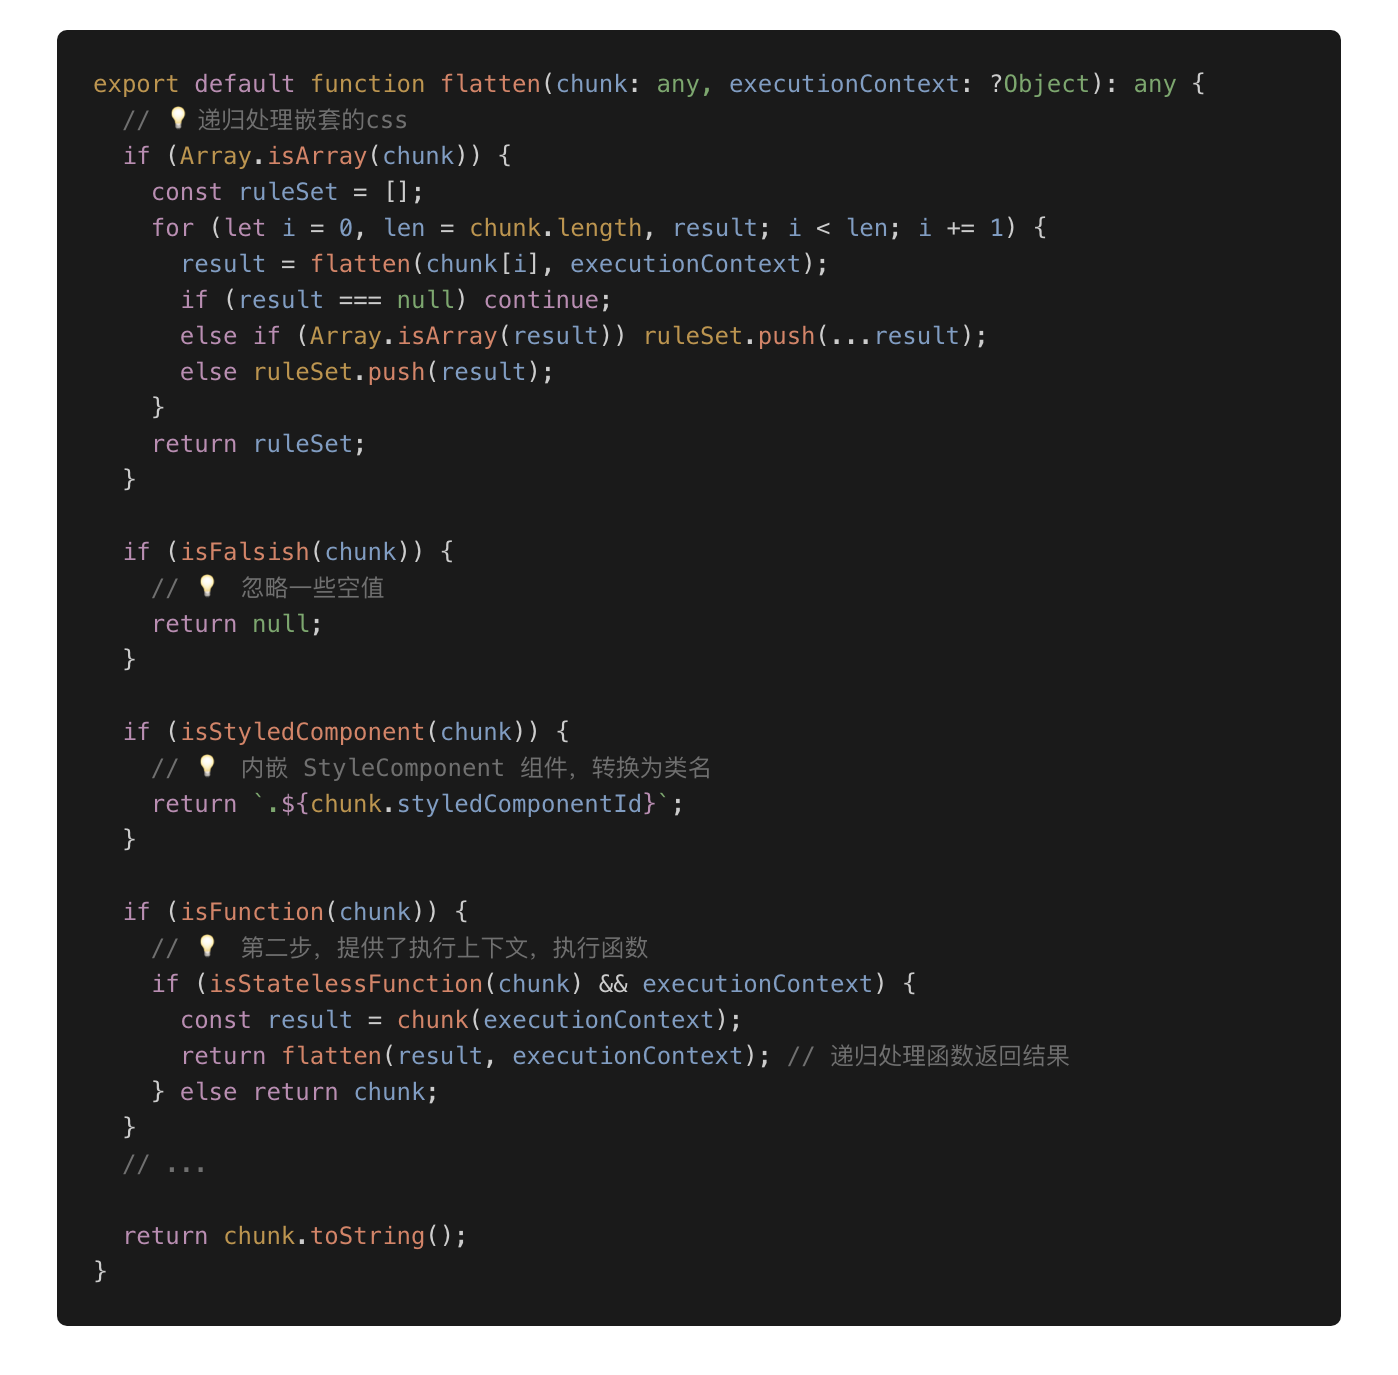
styled-components 会进行两次 flatten,第一次 flatten 将能够静态化的都转换成字符串,将嵌套的 css 结构打平, 只剩下一些函数,这些函数只能在运行时(比如在组件渲染时)执行;第二次是在运行时,拿到函数的运行上下文(props、theme 等等)后, 执行所有函数,将函数的执行结果进行递归合并,最终生成的是一个纯字符串数组
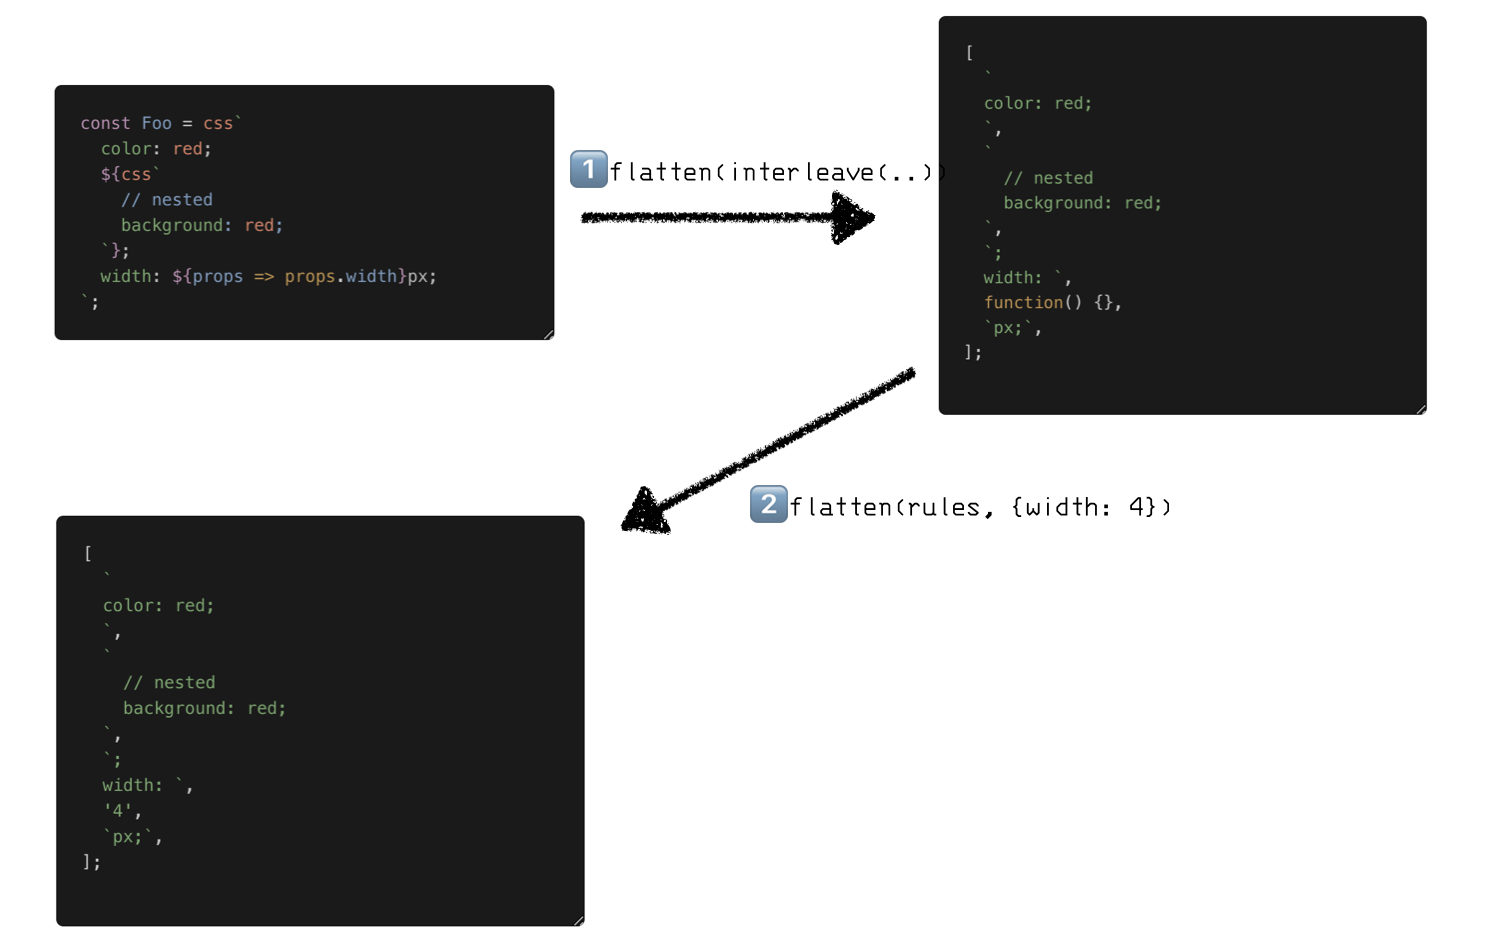
先从 styled 构造函数看起:

styled 构造函数接收一个包装组件 target,而标签模板字面量则由 css 函数进行处理的. 这个函数在 styled-components 中非常常用,类似于 SCSS 的 mixin 角色. css 函数会标签模板字面量规范化, 例如:

css 实现也非常简单:

interleave 函数将将静态字符串数组和内插值’拉链式‘交叉合并为单个数组, 比如[1, 2] + [a, b]会合并为[1, a, 2, b] 关键在于如何将数组进行扁平化, 这个由 flatten 函数实现. flatten 函数会将嵌套的 css(数组形式)递归 concat 在一起,将 StyledComponent 组件转换为类名引用、还有处理 keyframe 等等. 最终剩下静态字符串和函数, 输出结果如上所示。
我们再来看看 flatten 的实现:
React 组件的封装
- WrappedComponent: 这是 createStyledComponent 创建的包装组件,这个组件保存的被包装的 target、并生成组件 id 和 ComponentStyle 对象
- StyledComponent: 这是样式组件,在它 render 时会将 props 作为 context 传递给 ComponentStyle,并生成类名
- ComponentStyle: 负责生成最终的样式表和唯一的类名,并调用 StyleSheet 将生成的样表注入到文档中
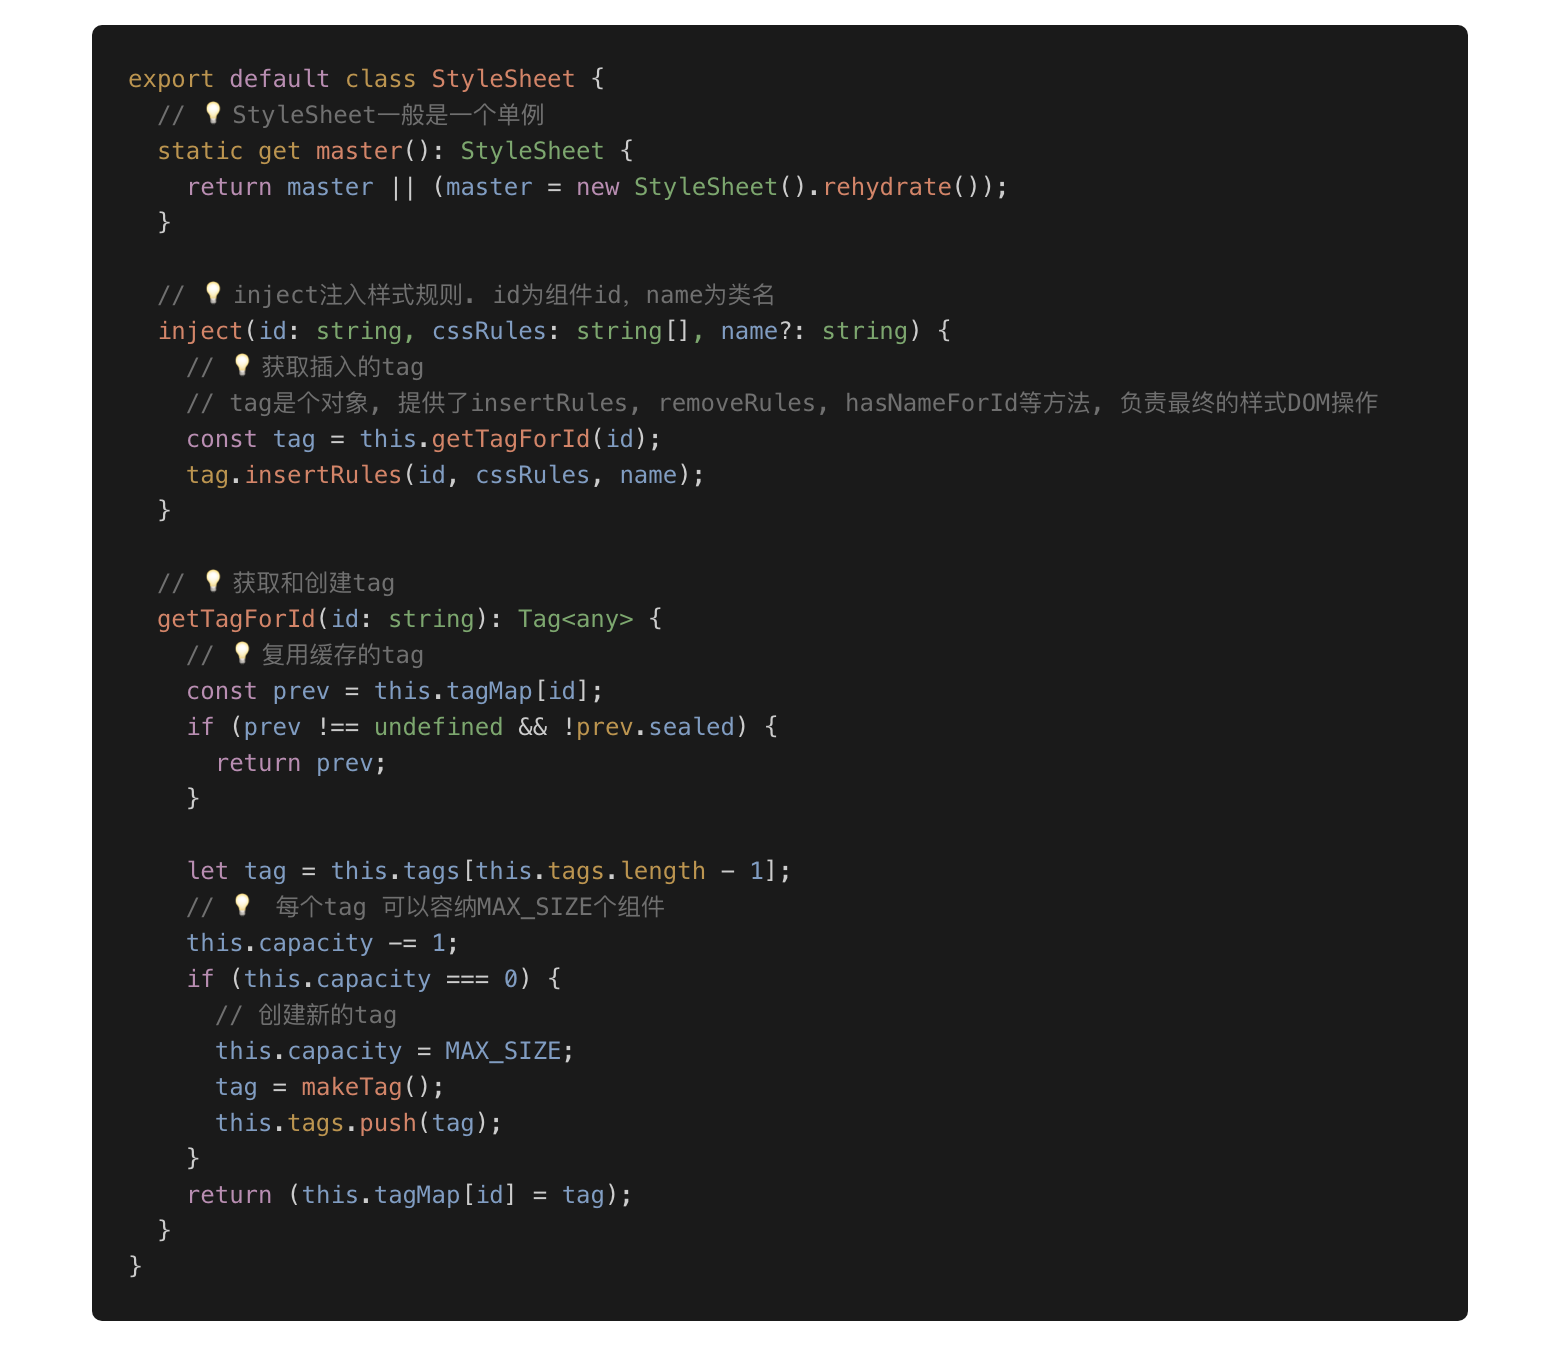
- StyleSheet: 负责管理已生成的样式表, 并注入到文档中
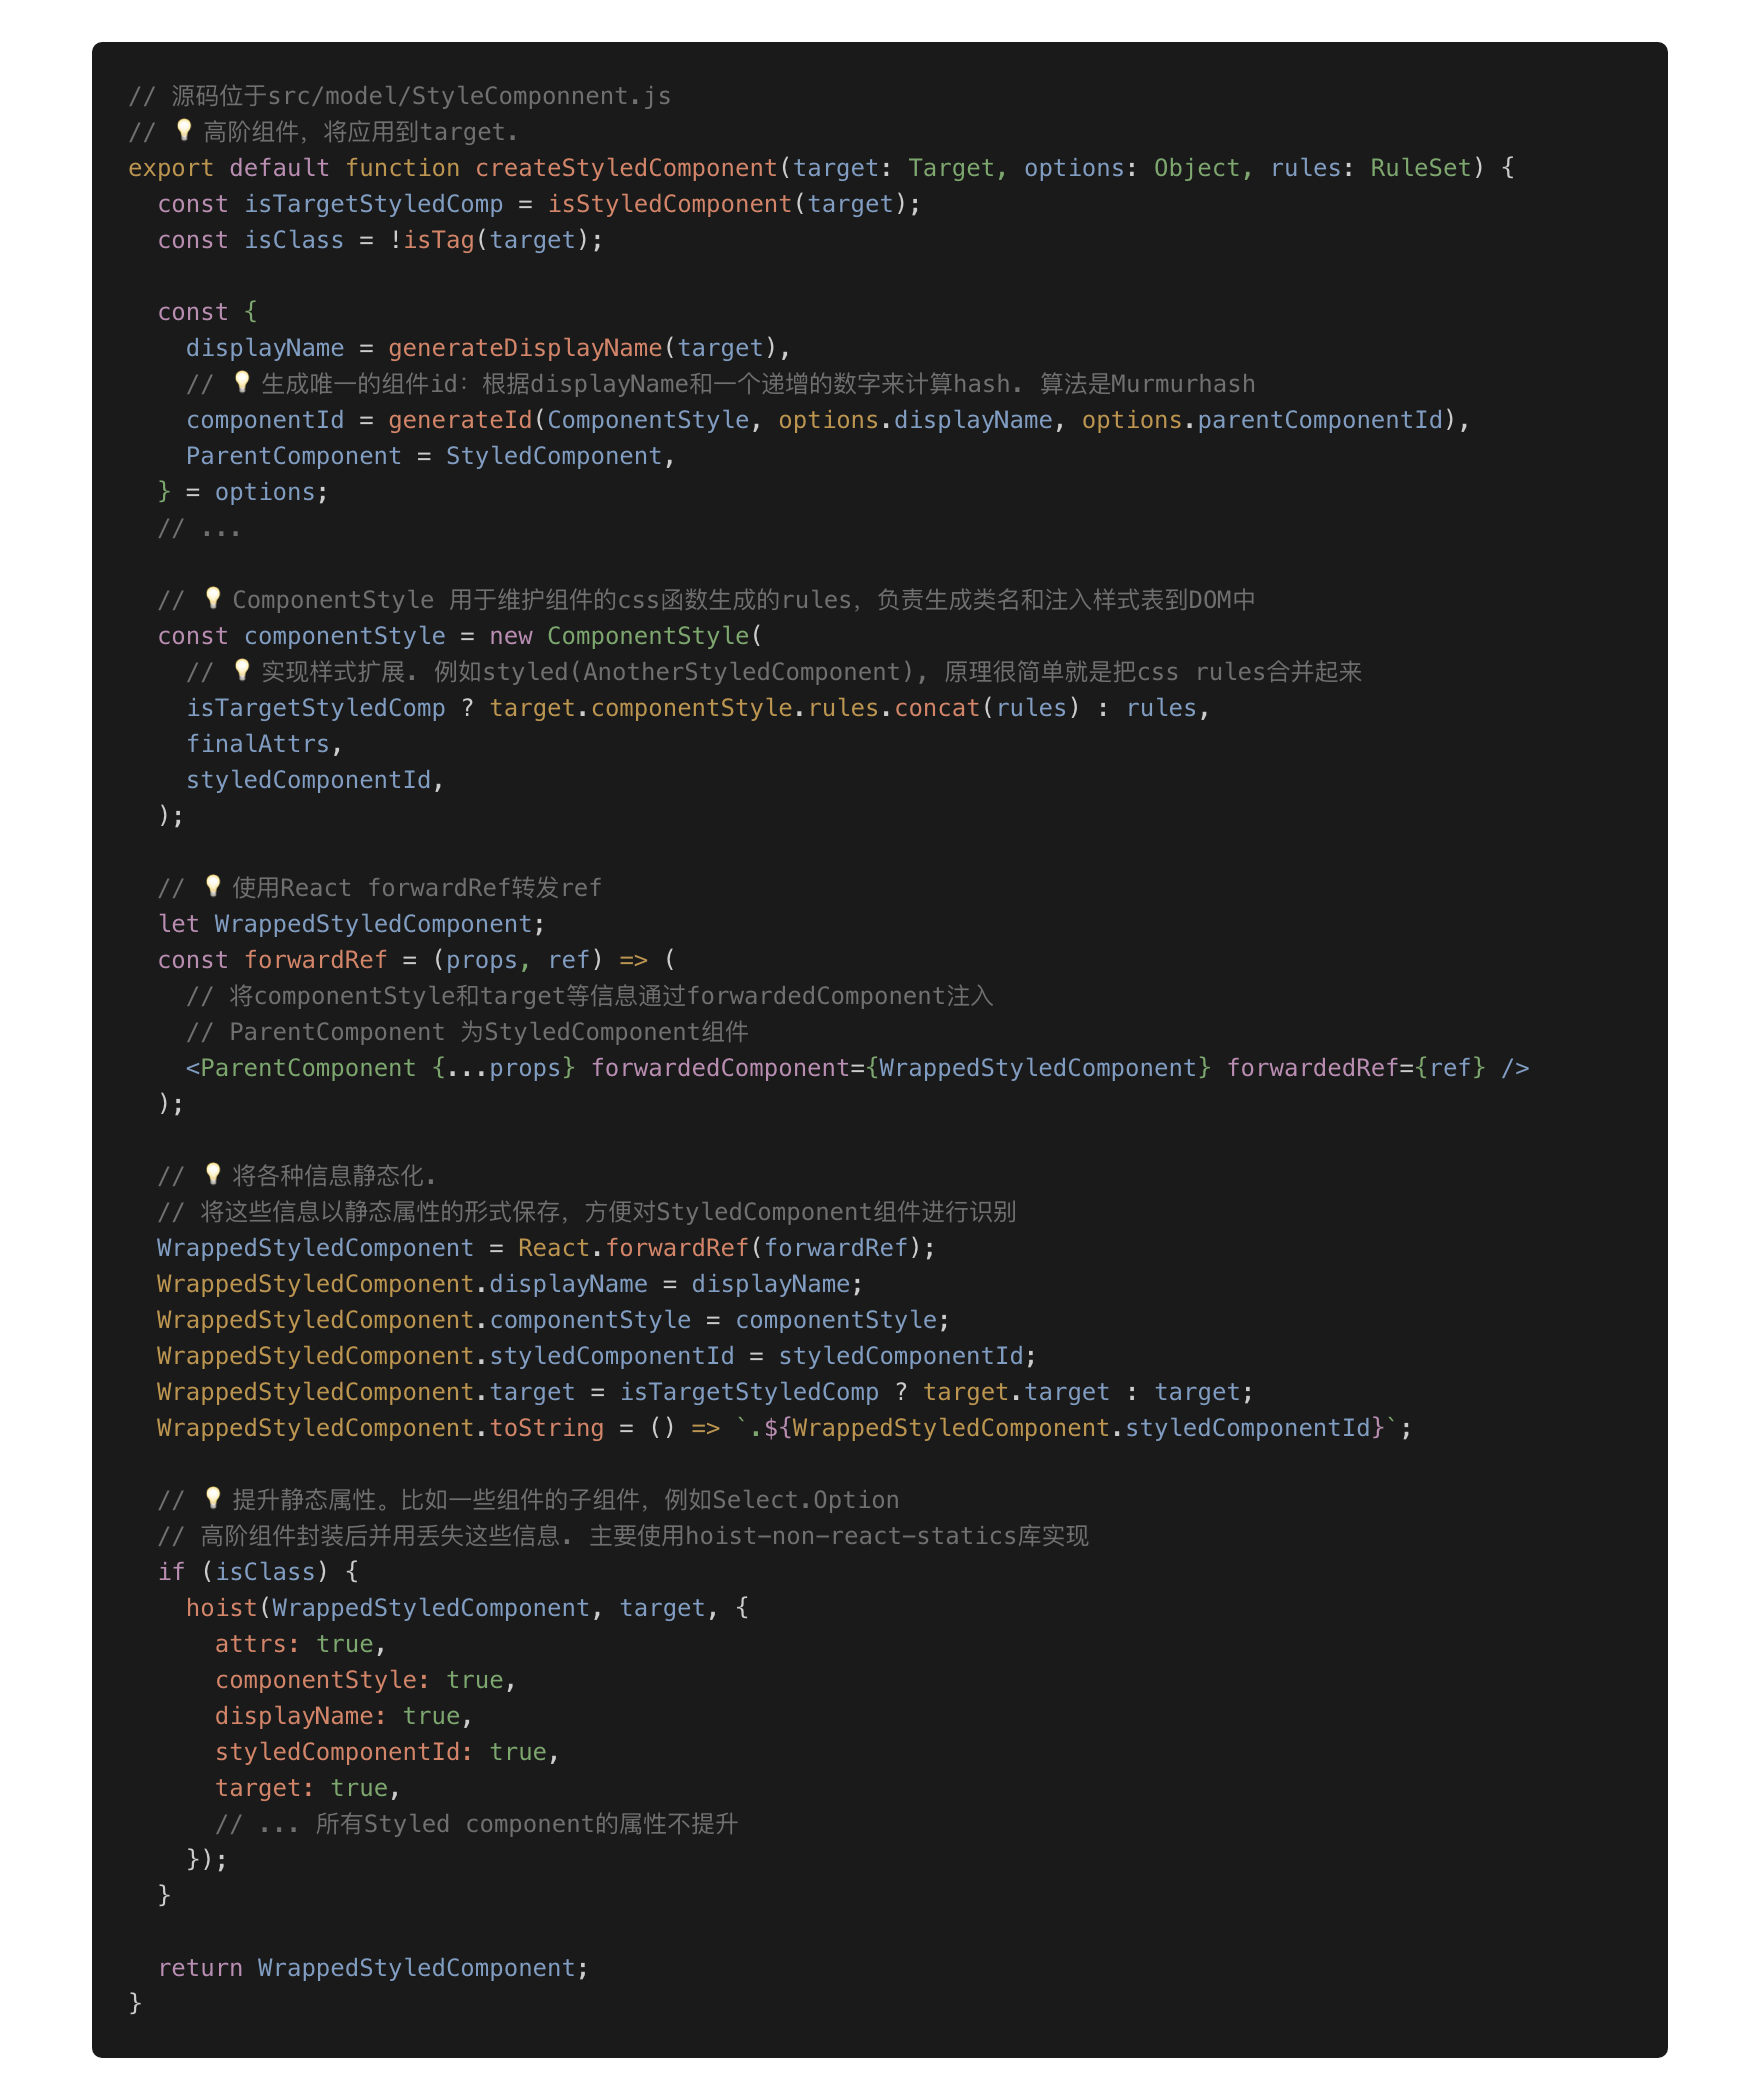
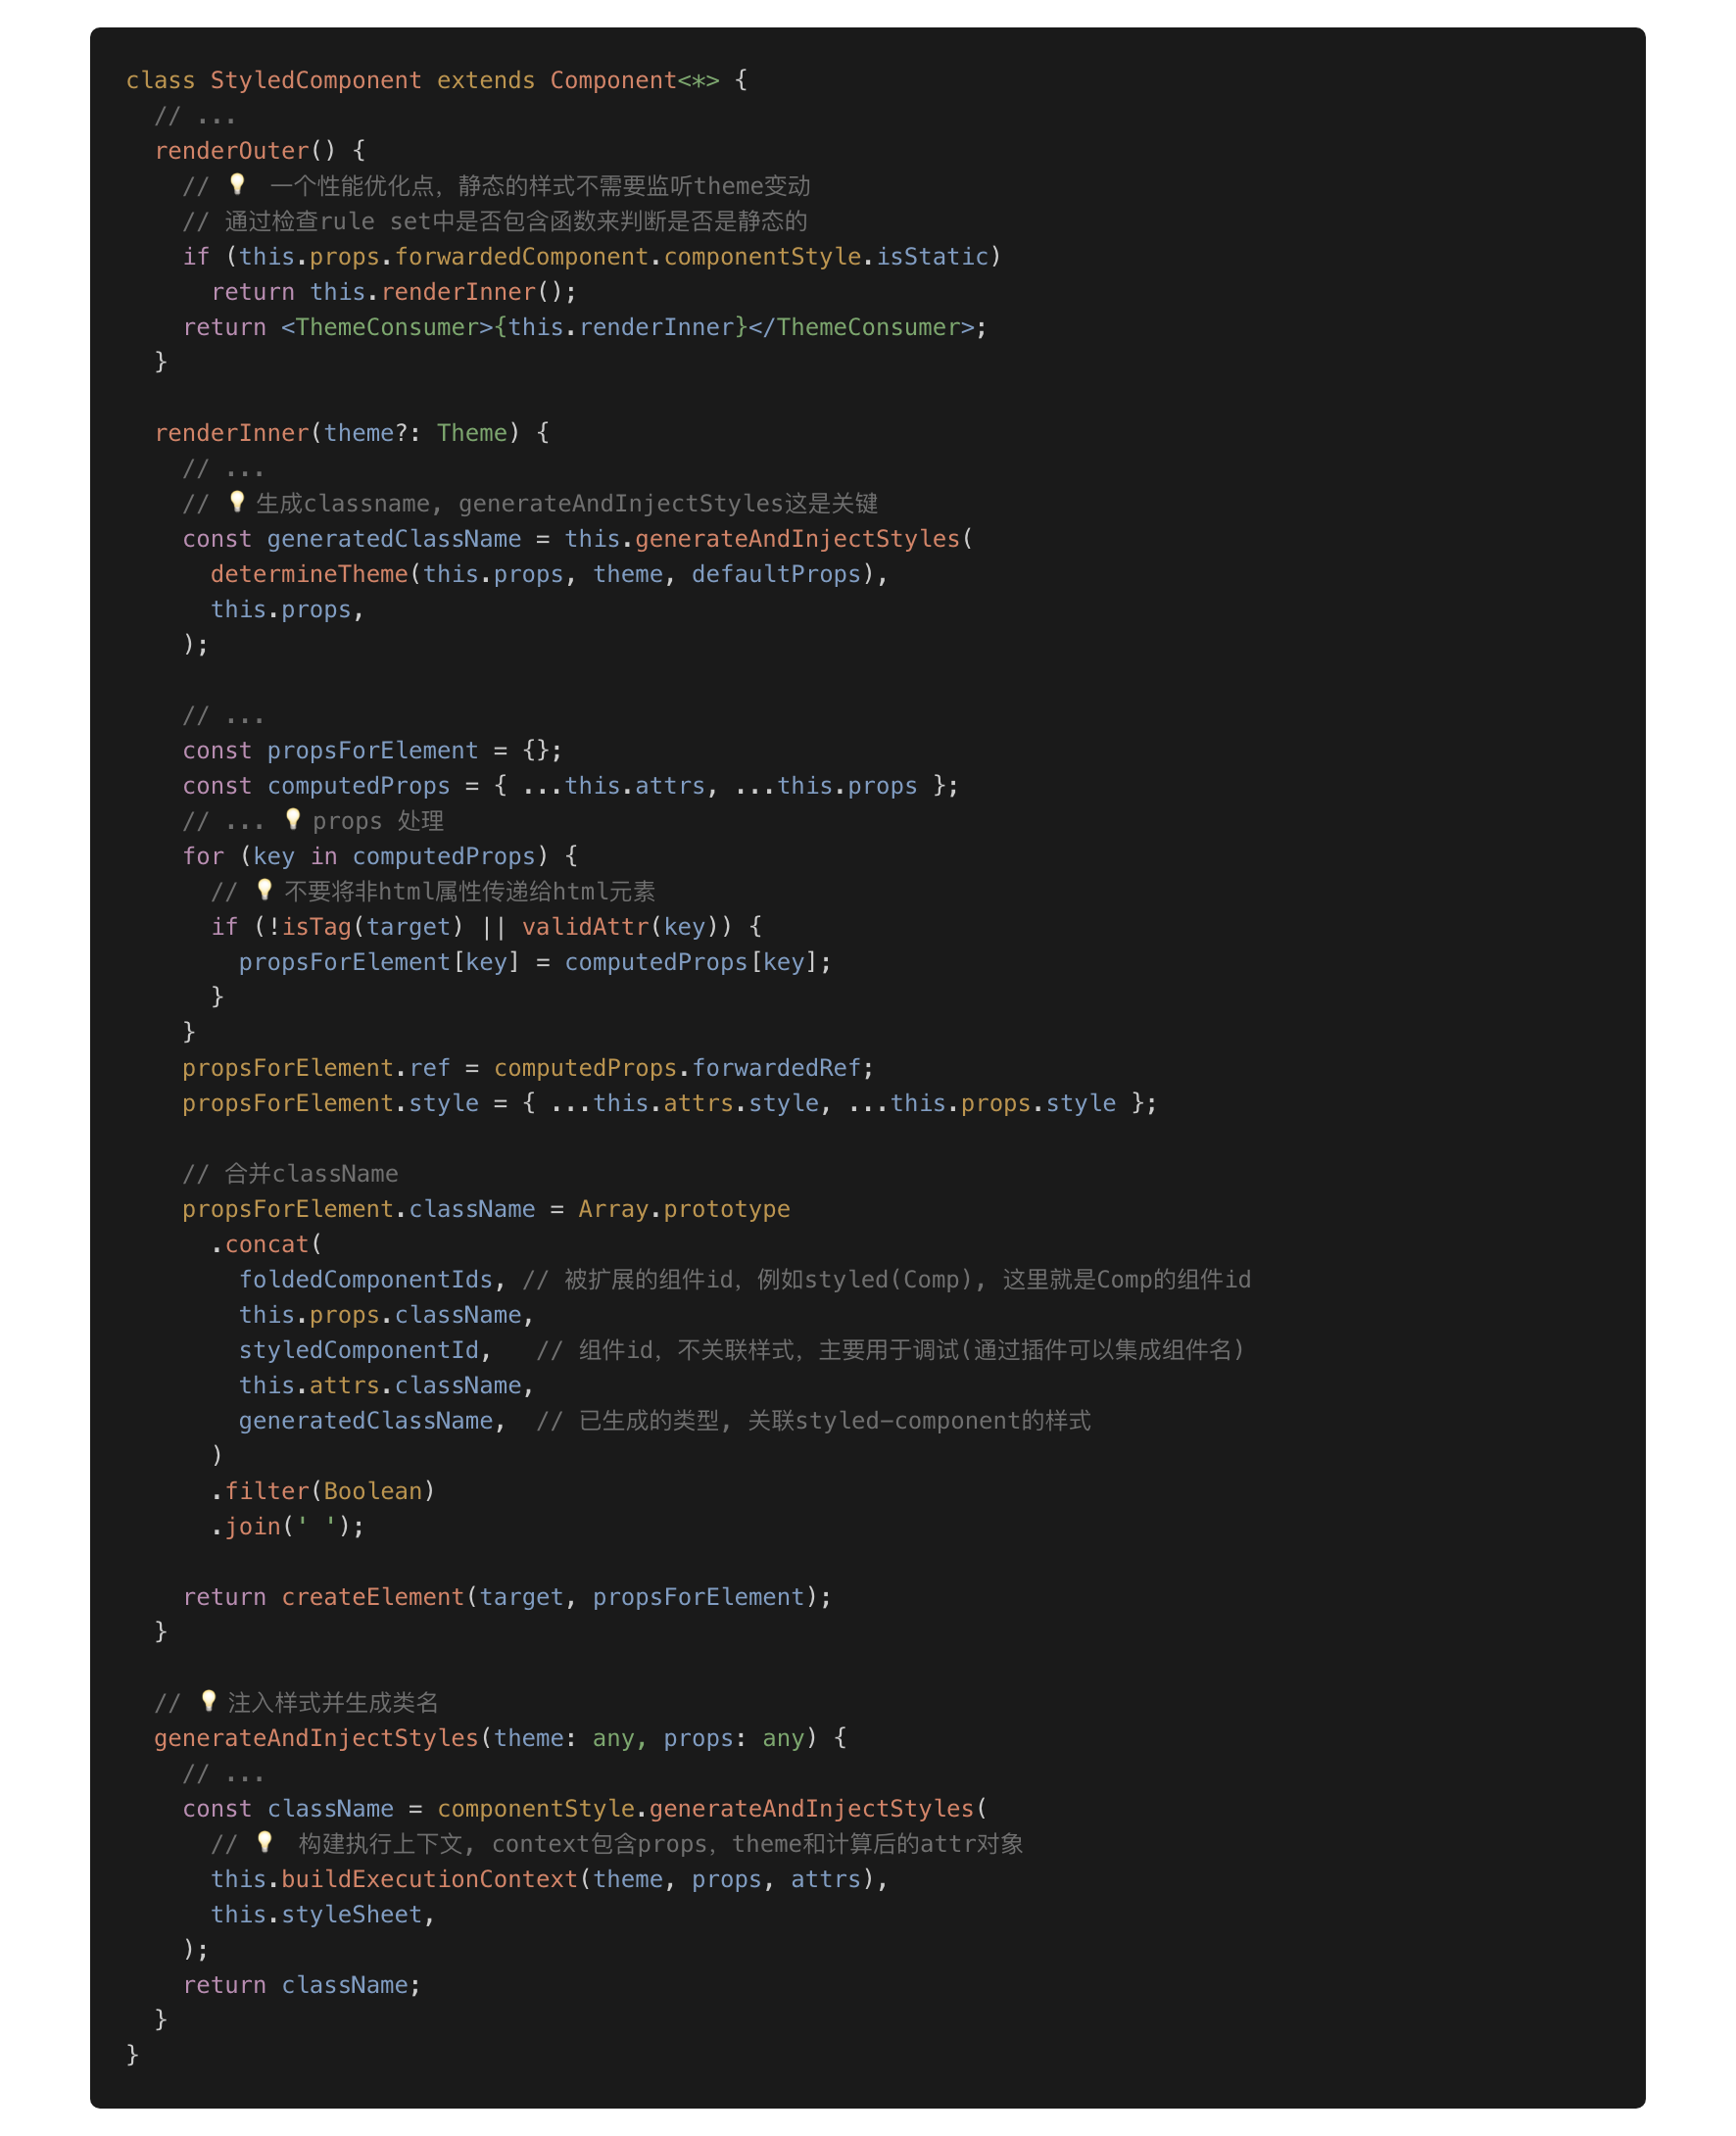
那我们在用 SC 的方式声明了一个组件后,SC 做了哪些操作呢?
1. 样式和类名的生成
首先生成一个 componentId,SC 会确保这个 id 是唯一的,大致就是全局 count 递增、hash、外加前缀的过程。hash 使用了 MurmurHash,hash 过后的值会被转成字符串。生成的 id 类似 sc-bdVaJa
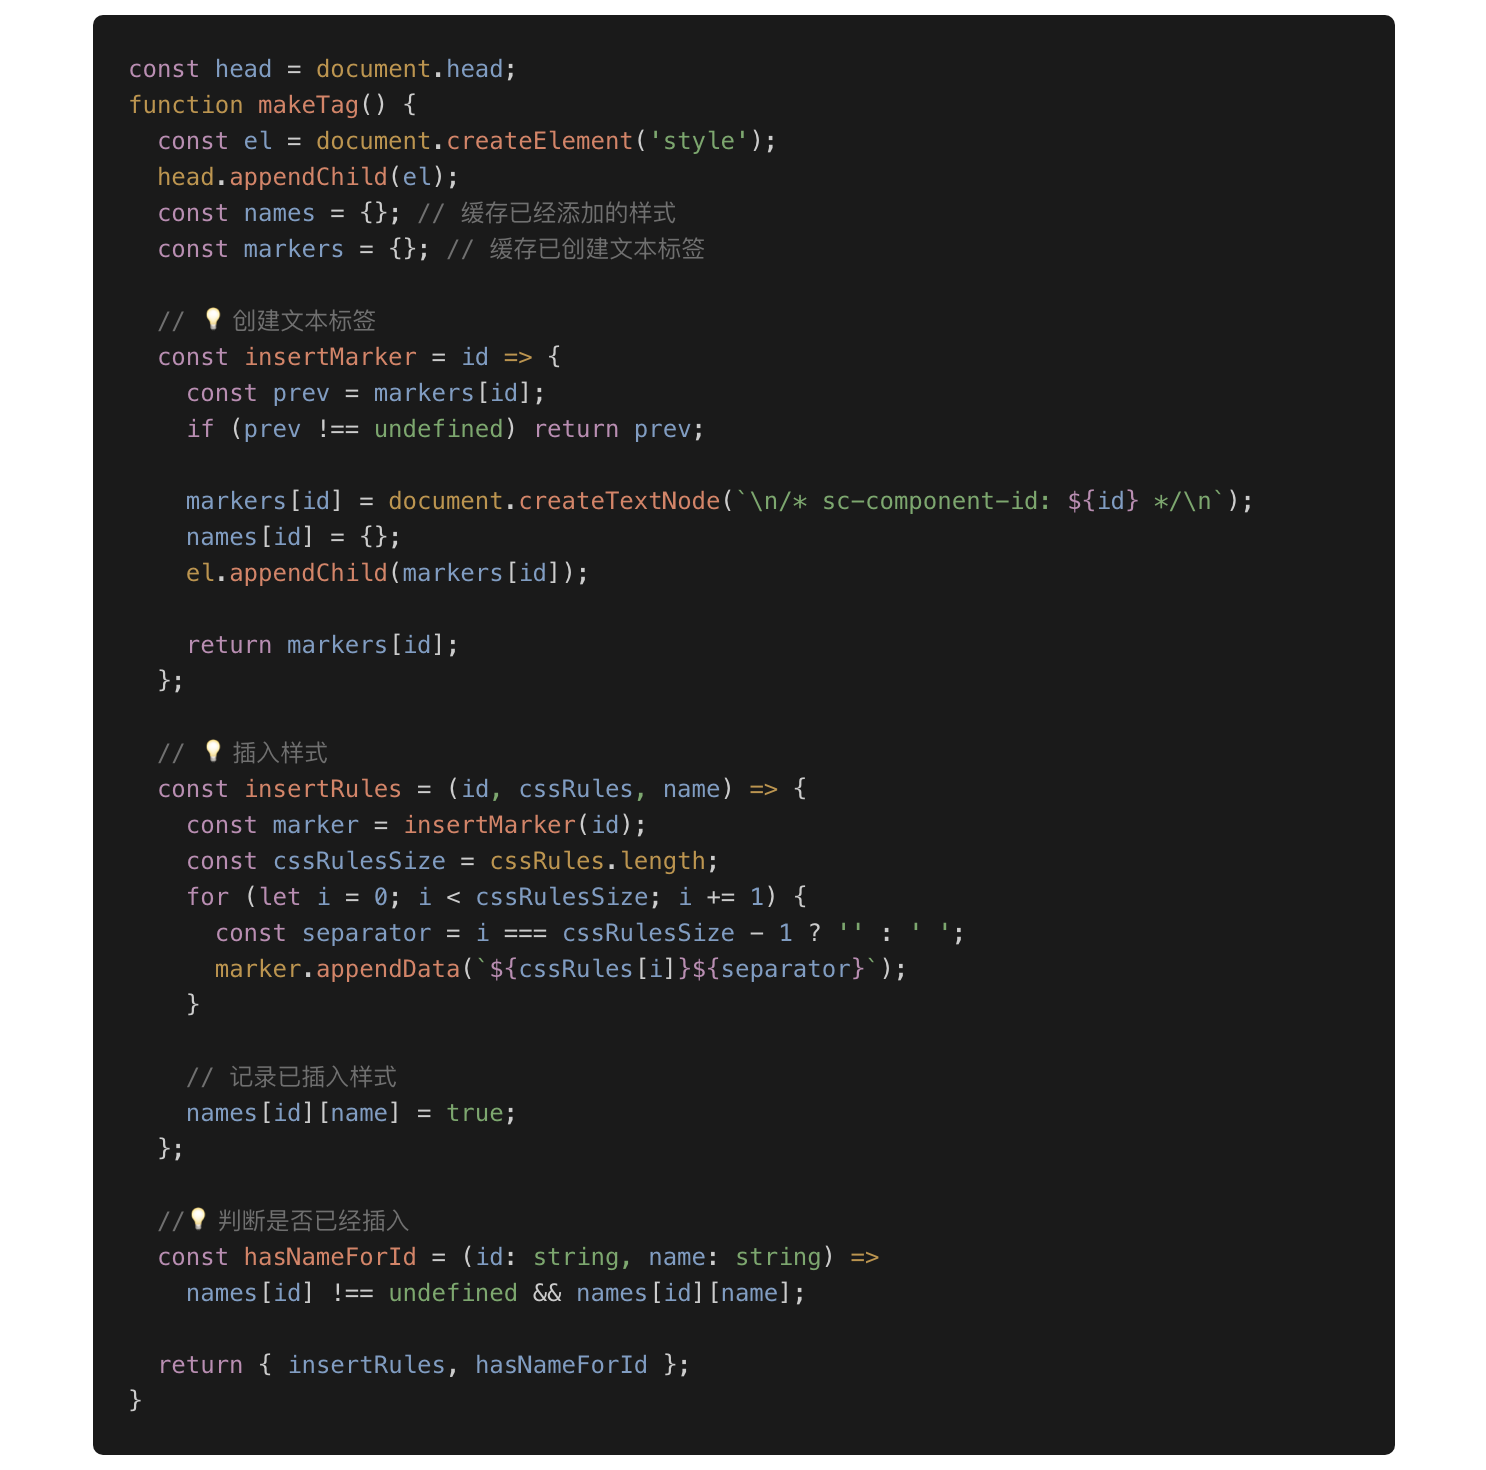
2. DOM 层操作
head 中插入一个 style 节点,并返回 className;创建一个 style 的节点,然后塞入到 head 标签中,生成一个 className,并且把模板字符串中的 style 结合 className 塞入到这个 style 节点中。
之后再根据解析的 props 和 className 来创建这个 element
性能优化建议
styled-components 每次渲染都会重新计算 cssRule,并进行 hash 计算出 className,如果已经对应的 className 还没插入到样式表中,则使用 stylis 进行预处理,并插入到样式表中;
另外 styled-components 对静态 cssRule(没有任何内插函数)进行了优化,它们不会监听 ThemeContext 变化, 且在渲染时不会重新计算。
通过这些规则可以得出以下性能优化的建议:
- 静态化的 cssRule 性能是最好的
- **降低 StyledComponent 状态复杂度。**styled-components 并不会对已有的不变的样式规则进行复用,一旦状态变化 styled-component 会生成一个全新的样式规则和类名。这是最简单的一种实现, 避免了样式复用的复杂性,同时保持样式的隔离性, 问题就是会产生样式冗余。 例如active 切换之间会生成两个类名:
const Foo = styled.div<{ active: boolean }>` color: red; background: ${(props) => (props.active ? 'blue' : 'red')}; `如果把 StyledComponent 看做是一个状态机,那么 styled-components 可能会为每一个可能的状态生成独立的样式。如果 StyledComponent 样式很多, 而且状态比较复杂,那么会生成很多冗余的样式..cQAOKL { color: red; background: red; } .kklCtT { color: red; background: blue; }` - ❌ 不要用于动画。上面了解到 styled-component 会为每个状态生成一个样式表。 动画一般会有很多中间值,在短时间内进行变化,如果动画值通过 props 传入该 StyledComponent 来应用样式,这样会生成很多样式,性能非常差:这种动画场景最好使用 style 内联样式来做
const Bar = styled.div<{ width: boolean }>`
  color: red;
  // 千万别这么干
  width: ${(props) => props.width};
`
styled-components 和 qiankun
在 qiankun 里,非第一次加载同一个子应用时(比如切换了子应用或者在主应用和子应用间切换),SC 会随机性产生丢失 cssom 的样式问题,可见相关 issue :
解决方案:
回退到旧插入模式
方案 说明 快速方案 A 目前使用现代 css style sheet 也就是 cssom 的 api 去操作样式是性能最好的,会把一堆 css 放到一个 标签里,这种方案速度很快,支持万级别的样式插入 慢速方案 B 而早期是一个 style 标签对应插入一个样式,这样会比较慢,但是他在开发环境会很方便于修改和调试 import { StyleSheetManager } from 'styled-components' export default function App() { return ( <StyleSheetManager disableCSSOMInjection> {/* ... */} </StyleSheetManager> ) }此处 disableCSSOMInjection 即代表回退到旧式单 style 对应单 css 方案。 官方 api 文档:disableCSSOMInjection
环境变量
// 默认值逻辑
const defaultOptions: SheetOptions = {
  isServer: !IS_BROWSER,
  // ↓ 这里是该 option 的默认值获取处
  useCSSOMInjection: !DISABLE_SPEEDY,
}

// ↓ 通过环境变量判断了默认取值
export const DISABLE_SPEEDY = Boolean(
  typeof SC_DISABLE_SPEEDY === 'boolean'
    ? SC_DISABLE_SPEEDY
    : typeof process !== 'undefined' &&
      typeof process.env.REACT_APP_SC_DISABLE_SPEEDY !== 'undefined' &&
      process.env.REACT_APP_SC_DISABLE_SPEEDY !== ''
    ? process.env.REACT_APP_SC_DISABLE_SPEEDY === 'false'
      ? false
      : process.env.REACT_APP_SC_DISABLE_SPEEDY
    : typeof process !== 'undefined' &&
      typeof process.env.SC_DISABLE_SPEEDY !== 'undefined' &&
      process.env.SC_DISABLE_SPEEDY !== ''
    ? process.env.SC_DISABLE_SPEEDY === 'false'
      ? false
      : process.env.SC_DISABLE_SPEEDY
    : process.env.NODE_ENV !== 'production'
)
也就是说你可以通过如下配置 env 环境变量实现默认关闭:
// .env
SC_DISABLE_SPEEDY = false
// or (in cra, `REACT_APP` prefix env will auto inject)
REACT_APP_SC_DISABLE_SPEEDY = false
styled-components 和 react 18
在useInsertionEffect出现以前,无论是使用useEffect注入还是useLayoutEffect注入,都存在重复计算和性能浪费的问题,而像 styled-components 使用 babel 插件则又显得不够灵活。 为了弥补这些主流方案的不足,React 用useInsertionEffect给 CSS-in-JS 库作者多一个选择,useInsertionEffect有这样的优点:
- 动态性:允许在运行时动态地注入样式,这使得基于组件的状态、道具或上下文的样式变化变得容易。
- 及时注入:保证了在任何布局效果触发之前插入样式,减少了样式的重复计算和布局抖动。
这个 Hooks 执行时机在 DOM 生成之后,useLayoutEffect 之前,它的工作原理大致和 useLayoutEffect 相同,只是此时无法访问 DOM 节点的引用,一般用于提前注入 <style> 脚本:
import { useInsertionEffect } from 'react'

function useDynamicStyle(styleObj) {
  const cssString = convertStyleObjToCSS(styleObj) // 将样式对象转换为 CSS 字符串的辅助函数

  useInsertionEffect(() => {
    const styleElement = document.createElement('style')
    styleElement.innerHTML = cssString
    document.head.appendChild(styleElement)
    return () => {
      document.head.removeChild(styleElement)
    }
  }, [cssString])
}
参考